
In honor of Labor Day, I decided to report about some of my recent manual labor in the garden. To be more precise, my laboring to create new garden beds. Way back in March, I complained about how my house looked like it had a green mustache. After many fits and starts, detours and delays, I am happy to report that there is one less Yew in front of the house. It took a lot of hand digging with a trowel and my "Harikari" knife and a few passes with the chainsaw, but we got one out. The next one looks mostly dead, so hopefully it will be much easier to dig out. While we were digging, I discovered that the Yew, which was probably about 25 years old, still had twine on it from when it was planted.

As this photo shows, the twine was starting to girdle the root. This crud should never be left on shrubs or trees when they are planted. It will still be there after the plant has died of old age.
The other project is much more satisfying because I was able to finish it. A couple of years ago I planted a young Cornus kousa between my driveway and the neighbors' driveway. This spring, at the girl's request, I planted a 'Carefree Beauty' Rose. One shrub plus one tree equals a bed, and it was time to make it look like one. I hate, detest, abhor the practice of edging beds by chopping at the edge and throwing the excess soil onto the bed (and all the plants therein). I won't do it; I categorically refuse to do it. I also won't leave the bed without an edge, as the lawn would rapidly invade and try to reclaim its lost territory. There needs to be a peacekeeping force between the new residents of the bed and the grasses that claim historical rights. My choice of peacekeeper is the brick edger, or as I prefer to call it, the mowing strip.
Step one is to get the bricks, which are actually landscaping pavers. Regular brick will break during the freeze/thaw cycle of a Chicago winter. Step two is to decide which way the bricks will be placed: on end, on their side, or flat. For the mowing strip out back, I laid them flat.

This time, I decided to put them sideways because this bed is on a slight slope. Step three is to lay them out as they will be placed to determine the exact number and position.

Step four, start digging,
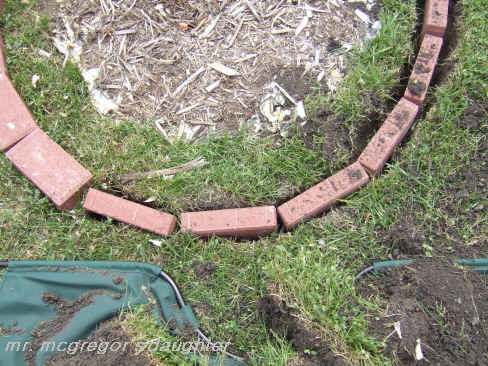
and step five, place bricks in sand to prevent frost heaving (which is nearly as bad as dry heaving).

At this point, it is important to make certain that the bricks are level and even. This step took the longest, as I had to make adjustments repeatedly due to an ant nest. (Don't ask.) Finally, the sand is topped up around the bricks and smoothed off. After a bit of compost and mulch, the bed is finished.
For all those who love before and after photos, here they are:

before

and after. In a year or so, the grass will have grown up to the edge of the bricks, softening the edges.